
Led Display Circuit Using Microcontroller Circuit Diagram LED Cube 4x4x4: Amazing 3 dimensional LED display. 64 LEDs makes up this 4 by 4 by 4 cube, controlled by an Atmel Atmega16 microcontroller. Each LED can be addressed individually in software, enabling it to display amazing 3d animations! 8x8x8 LED cube now availab… Raspberry Pi 2 B (any model) 220Ω resisters (3 pieces) 27 LEDs Soldering tools for building LED Cube Building 3x3x3 LED Cube: We have previously discussed the building of 3*3*3 LED cube in detail in this article: 3x3x3 LED Cube with Arduino. You should check this one for learning how to solder LEDs for forming LED Cube.
One of those DIY projects includes the LED cube circuit. It's basically a three-dimensional cube, basically made from light-emitting diodes. So in this article, we are going to explore How to make an LED Cube - 4x4x4 using Arduino.

LED Cube Display : 9 Steps (with Pictures) Circuit Diagram
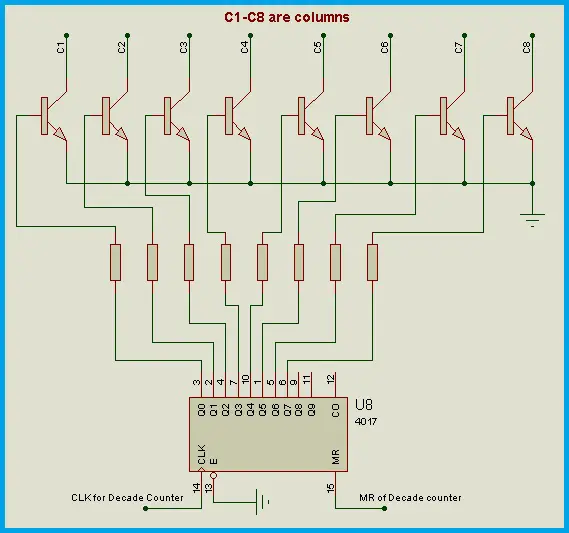
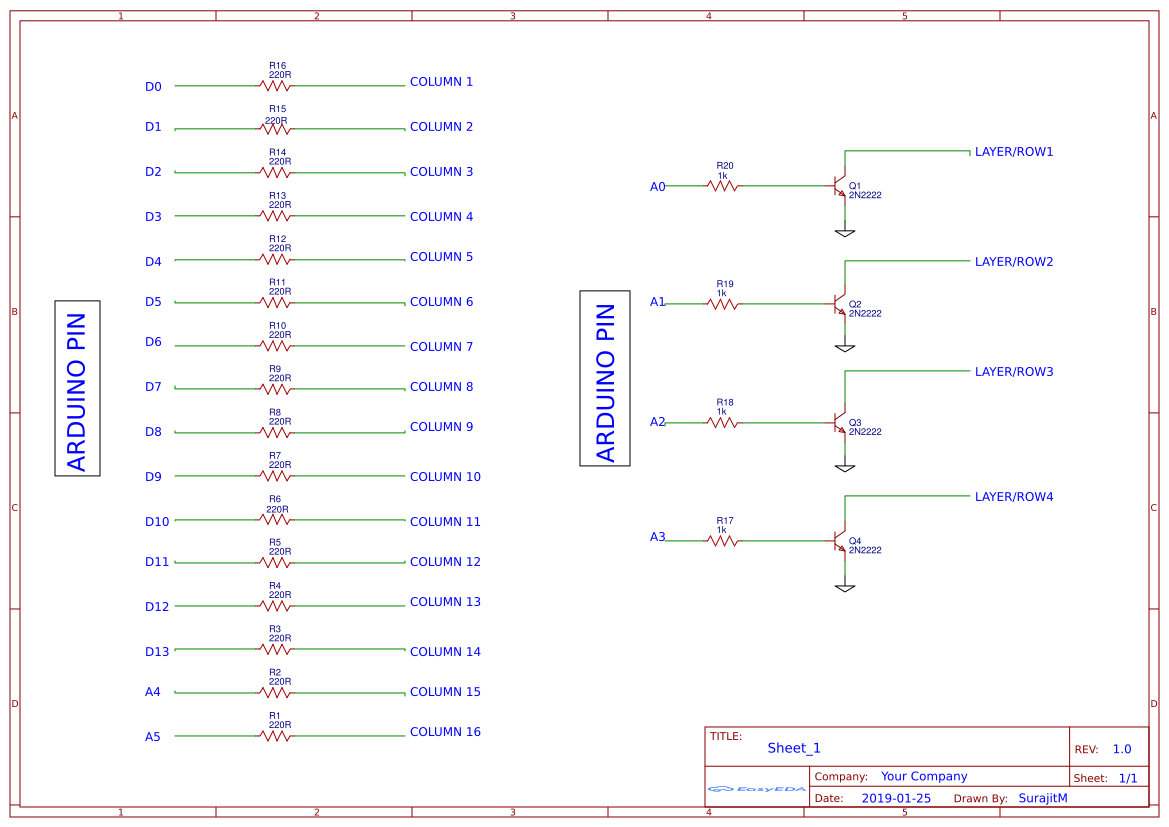
Here is what you need to make a LED cube: 512x LEDs (plus some extra for making mistakes!) 64x resistors. (see separate step for ohm value) 1x or 2x large prototype PCBs. The type with copper "eyes", see image. 1x ATmega32 microcontroller (you can also use the pin-compatible ATmega16) 3x status LEDs. You choose color and size. 3x resistors for the status LEDs. 8x 74HC574 ICs 16x PN2222 The circuit diagram for a 4 * 4 * 4 LED cube using Arduino Nano involves several components and connections to ensure proper functioning. Here's a step-by-step explanation. A LED cube allows us to create images and patterns by using the concept of an optical phenomenon known as persistence of vision (POV). So, In this tutorial, we will go over a step by step procedure on how to build a 4x4x4 LED cube u sing an Arduino nano. The cube has 64 blue LEDs that make up its 4 layers (positives) and 16 columns (negatives).
Creating an LED cube is a fantastic way to dive into the world of electronics and programming. In this tutorial, we'll guide you through the process of building an LED cube using Arduino Nano and custom PCBs from JLC PCB. This project will cover everything from designing the circuit to assembling the cube and programming it to display mesmerizing light patterns. In this tutorial I'll show you guys how to make this super simple 4x4x4 PCB LED cube "without over complicating anything".

LED Cube 4x4x4 : 11 Steps (with Pictures) Circuit Diagram
LED Cube Display: In this project, you will build an 8x8x8 LED cube as a display. After building the cube and learning the code basics, you will be able to write your own display animations. It is a great visual for scientific purposes and it will be a nice decorativ…
